|
|
Post by caeterle on May 4, 2014 13:36:01 GMT -6
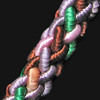
I did go overboard with this necklace. It is loooong. Any tips how to take good pictures of it? It's too big for my light tent and I'm not happy about the thought of dragging my manikin downstairs. Without an idea I'm afraid I have to keep it myself  I include a WIP picture because this is the best one to see what the rope looks like. The other two pictures were taken pretty much in the dark, I didn't expect them to be good, but I'm afraid it won't get much better in daylight.    |
|
|
|
Post by koolbraider on May 6, 2014 9:56:05 GMT -6
Cat, do you have one of those "bust thingies"? Just a stand with a slight neck. Maybe you could pull it toward the back and secure it (mine has a wire clip for that) so you can show the pearl part in the front. I'd go for a shot of the pearl section first even if I had to lay part of it on the flat surface in front of the bust because that's the "mostly important" part of the necklace (and hide the rest so nothing distracts from the pearl section). Maybe you have something to serve this purpose? Then a shot of what the "around the neck" looks like, again on the neck (or prop). Then another showing the full piece on a flat surface like your second pic. I think long necklaces are some of the hardest items to photograph because you can't really get the eye to focus only on the necklace and ignore everything else if you have to step way back to get the whole thing. And then, at last, one on a model. But since I think the most important part here is the pearls between the tubes and you definitely want to show this to the best advantage.
There are some things that just can't get put all in just one pic. Are you limited to just one? Sounds like an intro to the ever popular prop question. In fact, you are almost there with a pic of the pearls and one around a "neck". Substitute the finished piece for the unfinished piece and all's good. Maybe play around with pic sizes but am not sure if that's necessary here.
|
|
|
|
Post by caeterle on May 6, 2014 10:25:42 GMT -6
Thank you, Sue! I'm not limited to just one picture, but with the big pieces it's always hard for me to decide if the first picture should show the whole piece or if it's enough for a customer to just see part of it first. Since so many people are very visual, the first picture should grab attention, but what if they don't recognize that it's a necklace, on Google Images for example where they don't have a title. I don't have a bust stand like the one you mean. I usually take pictures on one of my two manikin heads. One of them has shoulder and a nice neckline, but not long enough for this, not even just the pearl part. I had tried it with part of the pearl part lying flat, but it gets the perspective all wrong. It also just about fits into my light tent as you can see. Pearls are so hard to photograph anyway. I'm an idiot, I should have tried other stones or maybe crystals  The last time I had that problem I swore to myself I'd never make a long necklace again! I hope the light will be good enough on the weekend to see if that already makes a bit of a difference. |
|
|
|
Post by koolbraider on May 6, 2014 10:49:04 GMT -6
(Image of necklace pinned to nose of manikin head so it fits in light tent...)
Honestly, Cat, I think your shot of the pearl section is perfect and really shows what any customer would need to see. Maybe you could play with attaching the piece to a board that fits into your tent? Hide pins with really nice props. I think your first one really does show that this is a necklace, especially since each side is shown apart.
(And maybe make sure the colors are consistent in all pics. I know monitors differ but I am seeing three different shades for the necklace.)
Took a second, third, fourth... look at the pearl pic. I'm thinking if the pearls were laid almost at a 45 degree angle, like from the bottom left to the top right, and not cut off at the bottom you would solve the first problem. I might also try start with the pearls echoing the placement of the rest of the necklace by starting them at the bottom right and going up to the left and over the coils; then you could get a good shot of the beginning. Play around with this because it looks like you have a good rhythm here. Is the pearl part flexible?
AND: maybe you might need to reduce the size of the necklace in the pic to get everything in. Personally, I wouldn't really like that because the pearl section is the selling point here.
Look at this as a learning experience. It would be a shame not to use pearls if you really want to.
|
|
|
|
Post by caeterle on May 6, 2014 11:24:47 GMT -6
One of the pictures was taken in the light tent during the day, the other two at night with two different light sources which accounts for the difference in shade. As I said, I just took those two pictures to show my basic problem.
There are two different kind of colorways plus AB finish in the seed beads, too, which doesn't make it easier because it changes somewhat with the light. I usually try to pick the pictures most true to the shade how I see it in the original, but that will take more pictures first to pick from.
The pearl part is not too flexible. The wire knit ropes themselves are not that flexible because of their bigger size, the seed beads add some extra stiffness and the wiring of the pearls even more. It's not like a stick of course, but I can't bend it like the upper part, it pretty much has to be straight.
Since there is no clasp, I don't have many options for how to lay out the upper part, either.
All in all the necklace is about a yard long if you count from one end of the rope to the other.
That means I can't reduce the size of the necklace much more, either. I just don't have the space around unless I take a picture outside the light tent. That brings back the question of background or props. I usually use my black acrylic stand for all my closeup pictures to have consistency in my shop (which is why I am still working on revamping pictures for older pieces), but with this necklace it's at its limit in size.
If all else fails, I might have to drag my manikin downstairs after all, only with a different outfit of course that fits better. That should give the neighbors something to talk!
Thank you for putting up with me, Sue. I don't want to sound as if I don't appreciate your advice - I absolutely do! - it's just that I had already tried a few things that didn't work out.
|
|
|
|
Post by koolbraider on May 7, 2014 9:30:24 GMT -6
Aaargh, AB finishes!!! How many times have I picked up what looked to be the right color and found it wasn't!!! I repeat: aaargh!
I'm still thinking you could do a close up with it coiled up on itself. This has been a great topic and a problem that most of us has dealt with before and it really would be a shame not to use whatever you want.
Maybe you have a color matched piece of duct tape to attach it to a bust. Nah, just use a really pretty pin. Better yet, make something to hang it from.
|
|